Site Maintenance
This site is in maintenance mode. Site editing and login will be disabled until update is complete. We expect to return to normal editing mode this afternoon around 12pm.
Sorry for any inconvenience, please contact webmaster@cns.utexas.edu with any questions.
Search Results
Pre-Filtered Directory Links
This is a guide to making pre-filtered directory links. The official Colbalt documentation can be found here.
Creating the url
In this example we will make a link that automatically show the Faculty from the Astronomy department. Here is what our final url will be.
http://wdev2.cns.utexas.edu/directory/everyone?option=com_cobalt&task=records.filter&ion_id=1&item_id=289&filter_name[0]=filter_cat&filter_val[0]=11&filter_name[1]=filter_k68066ab13794c412a4f4964d72492ee9&filter_val[1]=FacultyLets break this down into parts to better see what each piece does.
http://wdev2.cns.utexas.edu/directory/everyone
?option=com_cobalt
&task=records.clean
&ion_id=1
&item_id=298
&task=records.filter
&ion_id=1
&item_id=289
&filter_name[0]=filter_cat
&filter_val[0]=11
&filter_name[1]=filter_k68066ab13794c412a4f4964d72492ee9
&filter_val[1]=Faculty
Always include everything that isn't in bold. This is the base url that tells Cobalt we are going to make a filtered link. The parts in bold are our variables we want to sort by.
Creating a filter
After entering the base url we need to add filters to sort by. The first filter(filter[0]) will be the category. A filter always contains 2 parts, a filter type and filter value.
&filter_name[0]=filter_cat - This line tells Cobalt this filter type will be a category filter.
&filter_val[0]=11 - This line is the value of the category we want to sort by. In this case Astronomy is category 11. The category number can be found in the Cobalt backend.
Additional Filters
If we want to add more filters we can just keep extending the url and incrementing the filter number. (filter[1], filter[2], etc...) In this case we are already sorting by category Astronomy and we need to add the Faculty filter next. To do this we will use the field key value for the field Employee Type. The key value can be found in the cobalt backend.
&filter_name[1]=filter_k68066ab13794c412a4f4964d72492ee9 - This is the key value for the Employee Type field.
&filter_val[1]=Faculty - This is the value we want to filter by.
Final URL
Putting everything together in one line we get our final url...
http://wdev2.cns.utexas.edu/directory/everyone?option=com_cobalt&task=records.filter&ion_id=1&item_id=289&filter_name[0]=filter_cat&filter_val[0]=11&filter_name[1]=filter_k68066ab13794c412a4f4964d72492ee9&filter_val[1]=Faculty
To use this make a Joomla Menu item of 'External URL' and enter the url you've created.
Admin Guide
Creating well links(Explore Bars). There are six different colors to choose from. You want to go into HTML mode and enter the following code.
<div class="well well-large COLOR">
<h2>Your Text Here »</h2>
</div>
grey »
foam »
orange »
green »
tan »
blue »
Adding Captions
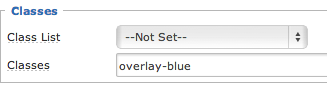
1. To add a caption overlay to a sidebar image, or any image for that matter, click the small button with a green plus on it located in the bottom right portion of the WYSIWYG.
2. A pop-up will appear and in the last available input field labeled "Classes", enter the desired overlay class. They can be accessed using the six following classes:
- overlay-grey
- overlay-foam
- overlay-orange
- overlay-green
- overlay-tan
- overlay-blue
The image below should clarify where caption classes are set.